17 Sep
Painter | Interior
Castle Douglas - DG7
Enquiry from: Sheila W
Start Date: Immediate
Customer visited the myinteriorpainter.co.uk site and submitted an enquiry. Glazing type: , Work description: Wallpaper small kitchen,
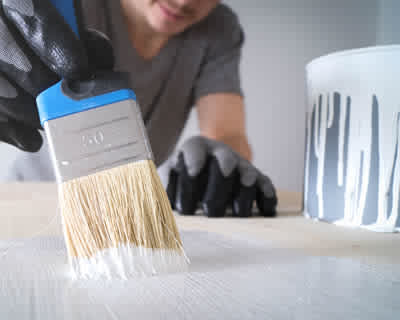
Interior painting can be a very cost-effective technique to reinvigorate the interior of your home. Painting is often completed as a DIY job, but professional painters and decorators can assure an immaculate finish and ensure that your decoration is going to last as long as possible.
The key to successful painting is preparation. Carefully pick a paint colour or think about applying two shades to establish an accent wall. Additionally think about the sheen, as paints will come in a wide range of finishes such as gloss, satin, egg shell or matte. Gloss and satin will last longer in higher traffic areas. There is a substantial assortment of suppliers and paints on the market so it's a good idea to to search around to get the paint that's perfect for your space.
Interior painters and decorators can provide you with lots of suggestions about paint and help you pick the perfect colour scheme for your interior spaces.
The average cost of a Painting and decorating is £800. Costs vary based upon the materials and the contractor chosen. The upper price range can be as high as £920. The material costs are mainly around £200
| Avg. price low | Avg. price low |
|---|---|
| Avg. price | Avg. price |
| Avg. price high | Avg. price high |
£1100
£825
£550
£275
£0
| Labour cost | £560 | |
| Material cost | £200 | |
| Waste removal | £40 |
Requests for quotations in Castle Douglas in March 2025
Requests for Painting and decorating quotations in Castle Douglas in March 2025. 0% change from February 2025.
Requests for Painting and decorating quotations in Dumfriesshire in March 2025. 0% change from February 2025.
Requests for quotations in Dumfries in March 2025
Requests for quotations in Annan in March 2025
Requests for quotations in Castle Douglas in March 2025
Requests for quotations in Canonbie in March 2025
Requests for quotations in Sanquhar in March 2025
Castle Douglas is a town in Dumfries and Galloway, Scotland. It lies in the lieutenancy location of Kirkcudbrightshire, in the eastern part of Galloway, in between the communities of Dalbeattie and also Gatehouse of Fleet. It remains in the ecclesiastical church of Kelton. Castle Douglas is developed next to Carlingwark Loch in which traces of primitive crannogs can be located, evidence of early inhabitation of the location. A large bronze cauldron having about 100 steel objects was discovered in Carlingwark Loch near Fir Island about 1866. The hoard of tools of iron and bronze is most likely Romano-Belgic of the late very first or early second centuries AD as well as is most likely to have actually been a votive offering. It is now in the National Museums of Scotland in Edinburgh. To the North of the town Glenlochar is the site of 2 succeeding Roman forts, the very first being erected throughout the invasion of Agricola as well as the 2nd throughout the Antonine period. They show up to have been for cavalry units and also proof has actually been located that a "vicus" grew up around them. They were deserted completely about 160.
Castle Douglas - DG7
Enquiry from: Sheila W
Start Date: Immediate
Customer visited the myinteriorpainter.co.uk site and submitted an enquiry. Glazing type: , Work description: Wallpaper small kitchen,
Castle Douglas - DG7
Enquiry from: Wayne C
Start Date: Immediate
bedroom. glossing. paper 1 wall. emulsion 3 walls, 1 ceiling. we have got the paint.and paper.
Castle Douglas - DG7
Enquiry from: Wendy H
Start Date: Immediate
I would like my living room lined and painted. The ceiling, walls and woodwork It's for a bungalow and room size approx 5m x5m
Castle Douglas - DG7
Enquiry from: Tina S
Start Date: Immediate
Paper throughout with wallpaper then emulsion with white paint, skirting boards and doors glossed, ceilings emolsioned and beading around top rose around lights on ceiling and any other bit needed doi...
Kirkcudbright - DG6
Enquiry from: Graham H
Start Date: Less than one month
hallway & stairs repapering Are you the property owner: Owner of the property Property Type: Semi detached How many rooms are you looking to have decorated: 1-2 rooms Are you looking to remodel th...
Answer a few quick questions, so we can match you with local decorators who can help.
Get free, no-obligation local painting and decorating quotes from 4 verified decorators working in Castle Douglas.
Compare customer reviews, services and prices, and choose the right tradesperson for you.
Would highly recommend, they found me a firm which I was happy with a quote they give me and went ahead and had my job done within 2 days of enquiring.
Good easy way to find a selection of trades you need all in one place.
Love LeadsDoWork it's a big part of my Business I would recommend to anyone
How Much For A Painter To Paint A Room?
If you’re looking to have your room painted, it’s only normal to get an idea of how much it’s going to cost so you can set a budget and start planning. As you would have expected, the cost of having a room painted is dependent on a wide array of influencing factors such as the size of your room, the type of paint to be used, your location and many more. As a result, providing a single and accurate answer to this question is almost impossible.
Generally, a regular 4 metres by 3 metres room will take just a couple of days to be fully painted including both the coving and woodwork. Outside London, most painters and decorators would charge within the range of £150 to £200 per day meaning that you’ll have a total labour cost within the range of £300 to £400. What’s more? You’d also have to consider the price of the paint to be used which is usually around £50. If you add all the costs together you’ll get an average cost of about £400 to £500.
Unfortunately, paint does not last an eternity. Therefore, there’ll come a time where you’d have to consider painting your room all over again. It may seem unwise to employ the services of a professional painter and decorator especially if you’re on a budget. However, in truth, calling in a professional can go a long way to save you time, stress and money. In other words, even if you’re worried about the cost, a professional painter is still your best bet in the long run as they know exactly what to do to ensure you derive maximum benefits from your painting project.
How To Paint A Room
Painting is a joyful task and it’s quite obvious why it’s one of the most popular DIY projects. Whether you’re painting as an experienced DIYer or as a newbie, this step by step guide will put you in the right direction. However, if you lack the confidence to carry out this task, then we’d recommend you get in touch with a seasoned professional who can guarantee the best results for help. This way, you get to save some time and additional money that would have resulted from possible costly errors.
So just before you head right into the task, there’s the need to determine the type of pain finish you would love to use which is to choose a colour. Now let’s get started!
• Prepare the room
✓ Remove all objects as much as you can from the room and cover the remaining furniture or objects with a sheet.
✓ Fill all holes on the surface to make for an even finish.
✓ Wash the wall with the help of a damp sponge. A sugar soap or diluted washing up liquid will work just fine.
✓ Tape the edges of objects you do not wish to paint like light switches, plug sockets and the likes.
• This step can be skipped if painting on an existing paint, but it’ll advisable to dilute small quantity of your selected paint to patch prime the holes that you’ve filled. If you have a large number of holes that was filled, then priming them would be smart.
• Mix or stir the paint thoroughly in a paint kettle to ensure an even and perfect mix.
• Now you’re ready to start painting! Start from the edges to form like a frame to work within with your roller. Once done, leave for about 4 to 6 hours to dry.
• For the second coat, simply repeat the above step to complete your painting project.
Can You Paint Over A Wallpaper?
According to some painting and decoration experts, painting over a wallpaper can never produce a result that’ll be as good as painting on a blank or naked wall. However in the event whereby there’s a pressing need to quickly beautify a room, it’ll be totally understandable if you don’t want to go through the hassle of the time consuming old wallpaper removal process.
Therefore, the short and simple answer to this question is yes, it’s absolutely possible to paint over a wallpaper and get a good outcome so far you don’t rush the process. To ensure your success if you want to paint over a wallpaper, there’s also the need to use the right tools and techniques. And just like any other DIY project, proper preparation before commencement is key.
If you’re going to paint over a wallpaper, many of the tools you’ll need to acquire are the standard painting and decorating products. This means that they can be easily procured at many DIY stores. To paint over a wallpaper, you’ll need a paint roller, top quality paint brushes, joint compound ( you’ll only need this in situations whereby your wallpaper is damaged or peeling), oil based primer, tape, sandpaper, paint ( can be water, solvent or oil based paints) as well as drop clothes ( for the protection of your furnitures).
As a rule of thumb, if you can easily remove the existing wallpaper, then you probably should before you start to paint the walls. However, if removing the wallpaper seems to be a pain or can significantly damage your wall, then it’ll be smart to simply paint over it. But before you proceed, you must also note that painting over the wallpaper will make it even harder to remove later in the future.
Interior painters and decorators will offer a wide range of services. These range from painting and wallpapering to other decorating jobs such as fitting skirting or architrave. Some painters and decorators will be trained to plaster as well, however, you should always ask them about this and not assume they will all be able to.
We can help you get more painting and decorating work with our qualified job leads and boost your business.
Join today