A&M Plastering & Rendering
Based: in Wembley, HA9 7SELatest review
Maurice L., UB9
Building work | Wall Rendering in Denham
Struggled to make appointment. Quotation not provided. A waste of time for both parties
Are you looking for Wall rendering in Ruislip? Our network of installers can assist with your project. Every one of our Builder in Ruislip are examined so you can see local testimonials, when business was founded, rankings, satisfaction as well as day rate, permitting you to make the appropriate decision on who to hire. Let us take the problem out of discovering as much as 4 pros for your Wall rendering project.
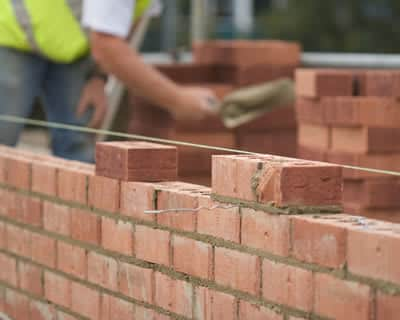
Wall surface Rendering look attractive and make a residential property look its best.
To guarantee the ongoing defense of these walls, making is commonly called for and also it's great at preventing weather damages to the brickwork. Without rendering, wall surfaces might just last between five and also 10 years before they begin to deteriorate.
With wall surface rendering, not just do you make certain a framework's strength, yet the walls will be much more eye-catching also as well as much easier to repaint. Of course, you'll have more security against natural environments as well.
And in today's globe you do not have to wait up until the summer season to have wall making performed. New advancements indicate that the drying procedure is currently much quicker.
Making your wall surfaces has actually never been less expensive and also specialist focus won't break the bank. With enhanced life span, the cheaper prices make providing a lot more affordable.
Getting Wall Rendering Quotes
We will provide as much as 4 Wall rendering pros in your area, that will supply quotes for the job you want done. You'll get a home visit from professionals in Ruislip that'll assist you to select the best Wall rendering for your house prior to performing the installation. Enter your postcode to start browsing currently.
The regular cost of Wall rendering is £5000. Costs vary based on the materials and the company chosen. The upper price range can be as high as £5750. The material costs are normally about £1250
| Avg. price low | Avg. price low |
|---|---|
| Avg. price | Avg. price |
| Avg. price high | Avg. price high |
£6300
£4725
£3150
£1575
£0
| Labour cost | £3,500 | |
| Material cost | £1,250 | |
| Waste removal | £250 |
Requests for quotations in Ruislip in March 2025
Requests for Wall rendering quotations in Ruislip in March 2025. 0% change from February 2025.
Requests for Wall rendering quotations in Middlesex in March 2025. 0% change from February 2025.
Ruislip is a suburban area in north east London which includes a populace of 31,000 and had been previously a parish in the county of Middlesex. There's been a good deal of urban improvement in recent time using funding from the Heritage Lottery Fund and thus, there's a mixture of houses from traditional to contemporary. For house developments you're considering inside the Ruislip area, review quotations from vetted experts and get the best value for money for all work you'd like completed.
Struggled to make appointment. Quotation not provided. A waste of time for both parties
Ruislip - HA4
Enquiry from: Zoe S
Start Date: 1 to 3 months
I need to get the pebbledashing knocked off my house then rendered Are you the property owner: Owner of the property Property Type: Terrace How many bedrooms do you have: 1-2 Bedrooms How many walls a...
Ruislip - HA4
Enquiry from: Lorna D
Start Date: Immediate
Front of house to be re rendered
Ruislip - HA4
Enquiry from: Claudia L
Start Date: Immediate
Removal of render at the back of the house - first floor and chimney stack, which may need some repair, new pebbledash to replace old render. Home owner Please call to appoint
Ruislip - HA4
Enquiry from: S
Start Date: Immediate
There is a crack under the bay window which is obvious from outside and indoor also a little crack on couple of place at top of the wall near to roof .
High Wycombe - HP10
Enquiry from: Joanne C
Start Date: Immediate

repair and repainting of approx 1 square meter of cracked render on an exterior wall. surrounding render is sound. accessible by ladder and i have the matching paint. are you the property owner: ...
Chesham - HP5
Enquiry from: Waqas Z
Start Date: Immediate
i need full(top and bottom) rendering for my property, this includes cavity walls on the build extension. are you the property owner: owner of the property property type: semi detached how many bedroo...
Slough - SL1
Enquiry from: Odette W
Start Date: 1 to 3 months
Homeowner Please contact to appoint How many walls are you looking to have rendered: 3 Property Type: Semi detached How many bedrooms do you have: 3-4 Bedrooms Are you the property owner: Owner of th...
High Wycombe - HP10
Enquiry from: Sarah A
Start Date: 1 to 3 months
A quote for external rendering a 3 bed semi house Are you the property owner: Owner of the property Property Type: Semi detached How many walls are you looking to have rendered: 3 Time scale: 1-3 mont...
Windsor - SL4
Enquiry from: Felipe C
Start Date: Immediate
We are looking to remove the pebble dash that we have on our 4 bedroom detached house and apply a smooth render to the outside of the house and paint over it.
Windsor - SL4
Enquiry from: S
Start Date: 1 to 3 months
External lime rendering Are you the property owner: Owner of the property Property Type: Detached How many bedrooms do you have: 5+ Bedrooms How many walls are you looking to have rendered: 4 Time sca...
Windsor - SL4
Enquiry from: Catherine C
Start Date: 1 to 3 months
Render and paint rear elevation of 2 bed terrace house. Please email only. Are you the property owner: Owner of the property Property Type: Terrace How many bedrooms do you have: 1-2 Bedrooms How...
Windsor - SL4
Enquiry from: Dean C
Start Date: Immediate
We have materials. 100 m2 three coat lime render. 8 windows to property. Scaffold up. Ready to go - Service Date: 20/03/2016 - Property Type: Terrace Are you the property owner: Owner of the property ...
Amersham - HP7
Enquiry from: David R
Start Date: Immediate
Need an outside retaining wall in our garden rendered. Smooth finish for painting.n20m x 1.2mnAlso need additional height added to wall (aesthetic) before renderingh so intersted in prices from someon...
Slough - SL2
Enquiry from: R
Start Date: Immediate
Home Owner Cracks in rendering to be refilled/repaired Please call to appoint *
Chesham - HP5
Enquiry from: Amjad M
Start Date: Immediate
Customer visited the myplasteringprices.co.uk site and submitted an enquiry. Property type: Semi detached, Work description: 2 metres by 3 metres ceiling to be boarded and plastered
Slough - SL2
Enquiry from: P
Start Date: Immediate
Home owner Rendering rear of new build property Immediately Please contact to appoint *
High Wycombe - HP11
Enquiry from: Jim G
Start Date: Immediate
Looking for a quote of rendering, K rend, 135m2, new build, scaffolding in, in the next couple of weeks, London Road, High Wycombe - Service Date: 22/10/2015 - Property Type: House - Job Type: New Bui...
High Wycombe - HP15
Enquiry from: Ian W
Start Date: Immediate
We have an internal water leak above a bedroom window and are told it is due to our render (mock Tudor style front of house). Needs to be watertight for winter. - Service Date: 26/09/2015 - Property T...
Maidenhead - SL6
Enquiry from: David H
Start Date: Immediate
Rendering needs to be repaired in patches. It is pebble-dash. Would like to know about changing from pebble-dash to smooth rendering also, whether this is possible and the cost. A general tidy-up is n...
High Wycombe - HP10
Enquiry from: Dawn R
Start Date: Immediate
home owner Back upper half of house rendering supply of materials time scale - immediate please call to appoint
Answer a few quick questions, so we can match you with local builders who can help.
Get free, no-obligation local wall rendering quotes from 4 verified builders working in Ruislip.
Compare customer reviews, services and prices, and choose the right tradesperson for you.
Would highly recommend, they found me a firm which I was happy with a quote they give me and went ahead and had my job done within 2 days of enquiring.
Good easy way to find a selection of trades you need all in one place.
Love LeadsDoWork it's a big part of my Business I would recommend to anyone
Wall rendering is basically a process which involves the application of sand, cement or polymer covering to a home’s exterior in such a way that enhances its look while also offering an improved stability. The process is a perfect solution for several exterior concerns mainly due to the support its able to provide. It’s highly beneficial for older homes whose walls may suffer from poor quality because of wear over time, while it’s also greatly advantageous for newer homes as it increases their stability while also enhancing their visual appeal.
Knowing how to apply render is a great skill to have with your home’s upkeep in mind. The project can be done quite easily by any competent and confident DIYer. However if you lack any of those attributes, then we’d recommend you get in touch with a reliable professional for help. In this article, we’ll take you through the wall rendering process.
✓ Prepare the walls. This involves examining the wall, repairing any structural defects as well as stabilizing any movements to prevent the render finish from failing.
✓ External details. This includes the removal of bargeboards, rainwater, soil pipes, alarm boxes and all other external details.
✓ Insulation. In the event whereby external wall insulation is to be fitted, this is the stage to do so.
✓ Developing a foundation for the render to fix to. Apply a render mesh over the insulation, bedded into the first base coat layer of render.
✓ Building up the render.
✓ Render finishes. There are a wide range of colour options as well as various finishes available from very smooth to textured. However, you should note that thin coat render systems are usually designed to be self coloured.
✓ Final finishes. This involves the re-application of the external rainwater, soil pipes and the other external details.
If you’re considering rendering your house or property, then you’d most likely want to know whether or not applying for a planning permission will be needed. In several cases, planning permission will not be required for the maintenance, repair as well as replacement of the existing render on your building. These activities are covered by what’s called “Permitted Development Rights, which allows you to carry out some activities without having to apply for a planning permission but always subject to following some strict guidelines. For rendering, as long as the material (render) possesses an identical appearance to those existing on the house as well as same colour, then you will not require a planning permission. However, there are a number of projects that have been highlighted in which a planning permission would be required. These includes the following:
✓ Re-rendering in a colour that different from the original one used on the house or building.
✓ Rendering over brickwork which was not originally covered.
✓ Rendering over pebbledash
✓ Removing pebbledash and replacing it with render.
Another exception to the Permitted Development rights are for houses in conservation areas, national parks or areas of outstanding national beauty.
Although, you wouldn’t normally require to submit a planning application for approval before you apply render, but in truth it’s actually a bit of a grey area which isn’t totally clear and doesn’t allow for much freedom or creativity. And due to this fact, homeowners who wants an absolute peace of mind may opt to apply for planning permission just in case. It’s also worth noting that whether or not a planning permission is required, a huge rendering work will need to comply with building regulations which includes the need to insulate walls on the inside or outside as part of the work on several older properties .
Rendering a house’s external walls is one of the cheapest and most effective ways by which a building can be made waterproof and also good looking. If you’re thinking about rendering your house, figuring out the cost of completion is usually one of the most important things you’ll have to consider before you proceed and if you don’t know where to start, finding an experienced tradesperson who possesses several years of experience as well as the ability to overcome the different issues that he may be faced with while on the project is paramount. If you’re able to get one, however, you should know that they rarely come cheap.
When trying to determine the accurate house rendering cost estimate , a tradesperson will put into consideration a great number of factors. Even at that, a rough estimate still requires both skills and expertise to be able to take into account all the necessary factors. In general, a typical 3 bedroom home in the UK will cost within the range of £4000 to about £5500 for a complete render job on the outside and covering from top to bottom.
Usually, the most important factor which play the biggest role when determining rendering costs is the area that’s going to be covered by the render mix. Professional contractors will provide a quote based on the rendering costs per square metre. Below are some rough estimates of rendering costs of properties depending on their size (without VAT).
✓ For a small mid terrace house of about 40 to 50 square metre, the total rendering cost estimate is £3000 to £4000.
✓ For a large mid terrace house of about 70 to 180 square metre, the total rendering cost estimate is £3000 to £5000.
✓ For a three bedroom detached house of about 100 to 160 square metre, the total rendering cost estimate is £4000 to £5500.
Render serves two basic functions. One is it’s protective qualities as render acts as waterproof for the wall which enables them breathe by allowing water vapour move from the inside to the outside of the structure while also working to prevent water or rain from finding its way inside the structure. While the second function is the decorative qualities as render is able to provide the structure with a fine finish and colour to make the building a lot more appealing and correcting faults in line and level in the masonry.
If you wish to apply render on your external wall, you’d probably be wondering just how thick the render should be to perfectly serve both of functions. In this article, we’re going to take a look at just that!
For a render thickness, the British Standard Wind Driven Rain Index has come up with 4 ratings which include Sheltered, Moderate, Severe as well as Very Severe. An area with Very Severe rating include South West England. This rating implies that the thickness of the render in this area should be increased to at least 20mm for a direct one coat render applications as well as 5 to 6 external wall insulation base coat applications. And if you happen to reside within one mile of the coast, it’s strongly recommended you incorporate an extra repellent protection like Paraguard AG from Parex.
In general, render that’s prepared on site with cement and sand should be have a minimum of 20mm to 25mm thickness. Although, it should be noted that the quality of the render is based on quality of the sand incorporated, the design mix as well as being largely dependent on how good the mixing technique from the applicator is. The most common reasons why traditional renders fails is due to both poor mixing ratios and low quality materials used.
We can help you get more wall rendering work with our qualified job leads and boost your business.
Join today