03 Oct
Building work | Wall Rendering
Prestwick - KA9
Enquiry from: J A
Start Date: Immediate
REMOVE EXISTING RENDER AND REPLACE WITH NEW
Are you seeking Wall rendering in Prestwick? Our network of installers can aid with your task. All of our Builder in Prestwick are checked so you can see local reviews, when the business was started, rankings, approval and price, permitting you to make the appropriate choice on who to work with. Let us take the problem out of discovering up to 4 professionals for your Wall rendering task.
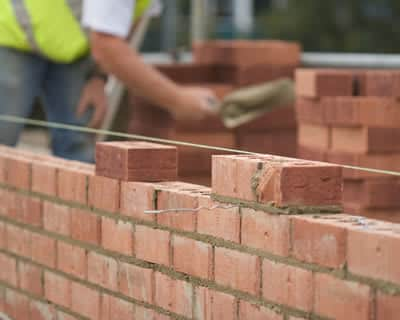
Wall Rendering look appealing and make a building look its ideal.
To make sure the ongoing defense of these wall surfaces, providing is typically required and also it's terrific at protecting against weather condition damage to the brickwork. Without providing, walls might just last in between five and also ten years before they start to deteriorate.
With wall rendering, not only do you guarantee a framework's strength, but the wall surfaces will be much more eye-catching as well and much easier to repaint. Naturally, you'll have additional security versus natural elements too.
And also in today's globe you don't need to wait up until the summer season to have wall providing executed. New developments mean that the drying procedure is now much quicker.
Providing your wall surfaces has never been cheaper and also professional focus will not spend a lot. With enhanced life span, the cheaper rates make rendering much more affordable.
Getting Wall Rendering Quotes
We will provide as much as 4 Wall rendering pros locally, that will supply quotes for the job you want done. You'll receive a home visit from professionals in Prestwick who'll help you to pick the appropriate Wall rendering for your house prior to accomplishing the installment. Enter your postcode to start browsing currently.
The regular cost of Wall rendering is £5000. Costs vary based on the materials and the company chosen. The upper price range can be as high as £5750. The material costs are normally about £1250
| Avg. price low | Avg. price low |
|---|---|
| Avg. price | Avg. price |
| Avg. price high | Avg. price high |
£6300
£4725
£3150
£1575
£0
| Labour cost | £3,500 | |
| Material cost | £1,250 | |
| Waste removal | £250 |
Requests for quotations in Prestwick in March 2025
Requests for Wall rendering quotations in Prestwick in March 2025. 0% change from February 2025.
Requests for Wall rendering quotations in Ayrshire in March 2025. 0% change from February 2025.
The community of Prestwick remains in South Ayrshire on the south-west shore of Scotland. It is about 30 miles south-west of Glasgow. It links the bigger community of Ayr, the centre of which being 2 miles south. According to the 2011 Census, the town has a long-term population of around 14,901. With the name being Old English for 'priest ranch', Prestwick was traditionally an outlying farm of a religious home. The coastal strolls around the community have actually attracted a number of monarchs, with Robert the Bruce declaring that the waters of the well at St. Ninians church cured him of leprosy. Despite being a Burgh of Barony for more than 1,000 years, the location was not a town up until the train was available in the 1840's, permitting the middle class from Glasgow to construct grand houses along the coastline on a larger range. For locals intending on travelling afar, Prestwick is participated in by Glasgow Prestwick Airport terminal, serving a number of European destinations along with transatlantic and international freight trips. For around 50 years, it functioned as a transatlantic portal. Likewise found in the community is an enduring esplanade of 1 mile along Prestwick Bay, a part of the Firth of Clyde. It has 2 kids's play areas, and an indoor task centre lies at the north end. This is alongside a significant backyard that was initially an open air pool. The community is extensively acknowledged as the very first house of the Open Golf Championship, which was used the Prestwick Old Course between 1860 and 1872. The town is, currently, house to two golf courses. For all of your residence upgrades, see to it to make usage of credible experts in Prestwick to make specific of quality.
Prestwick - KA9
Enquiry from: J A
Start Date: Immediate
REMOVE EXISTING RENDER AND REPLACE WITH NEW
Irvine - KA11
Enquiry from: Graham S
Start Date: 1 to 3 months
render exterior of house
Irvine - KA11
Enquiry from: Graham S
Start Date: Immediate
render exterior of house
Irvine - KA11
Enquiry from: Graham S
Start Date: Immediate
render exterior of house
Ayr - KA6
Enquiry from: John H
Start Date: Immediate
Full house rendering
Irvine - KA12
Enquiry from: Mark M
Start Date: Immediate
Internal walls are damp. Cracks on the outside rendering. I believe the rendering is cement based. How much per square meter would it cost to remove the cement based render, re-point the walls and re...
Irvine - KA12
Enquiry from: Graeme M
Start Date: Immediate
home owner semi detached re rough cast house & extension please call to appoint
Irvine - KA11
Enquiry from: Allan W
Start Date: Immediate
Removal of wet cast and full replacement with dry cast flat rendering. Bungalow style house - Service Date: 01/06/2015 - Property Type: Detached Are you the property owner: Owner of the property How ...
Ayr - KA8
Enquiry from: Enis K
Start Date: Immediate
Home Owner Wall Rendering for Whole Property Please Call to Appoint
Answer a few quick questions, so we can match you with local builders who can help.
Get free, no-obligation local wall rendering quotes from 4 verified builders working in Prestwick.
Compare customer reviews, services and prices, and choose the right tradesperson for you.
Would highly recommend, they found me a firm which I was happy with a quote they give me and went ahead and had my job done within 2 days of enquiring.
Good easy way to find a selection of trades you need all in one place.
Love LeadsDoWork it's a big part of my Business I would recommend to anyone
Rendering a house comes with a plethora of benefits. Not only is it able to brighten up houses that looks tired especially those with damaged brickwork or having discoloured render, but its also the final step of external wall insulation.
If you own a 3 bed house, you’ll probably want to know just how much it’ll cost to have it rendered. If yes, then you’ve come to the right place! In this article, we aim to look at the cost of rendering a house using the standard 3 bed house as an example. Firstly, it should be stated that there are numerous factors that affects the price of a rendering a house which includes the rendering type, the size of the house, the ease of access, the prep work required, whether or not scaffolding will be needed as well as your location and the quality of the contractor your hire. Out of all these factors, the most significant variables are probably the type of rendering you go for and the size of the house.
There are three types of render and the one you opt for will play a key role in the price of your 3 bed house. In this article, we’re basing our cost estimate for a 3 bed house (3 bed detached) on the size ranging from 110 per square metre to 160 per square metre. Now let’s look at the cost per square metre of each rendering type.
✓ The silicone or acrylic thin coat render is usually the most expensive option of the lot due to the fact that they’re the newest and also the best type of render. This rendering type usually costs within the range of £45 to about £75 per square metre.
✓ The monocouche modern through coloured rendering type are able to offer a decorative and waterproof finish for walls. They usually costs within the range of £35 to about £70 per square metre.
✓ Sand and cement render type is the traditional type which has been applied for several years. This rendering type usually costs within the range of £20 to about £45 per square metre.
Aside from the cold weather not being the most pleasant condition to work in, the winter weather can also cause a lot of problems for construction workers and even more so when you’re working with render. Poor weather conditions can generally cause a lot of harms on the final finish of a render. Below are some of the reasons why you should not consider rendering in a bad weather.
✓ Lime bloom. Render can be impacted by lime bloom as they are subjected to damp conditions and low temperatures while curing. This is due to the fact that cement are intolerant to slower drying conditions especially immediately affect its application.
✓ Top coats can be compromised. Coating are likely to get washed off before they’re even afforded the chance to set if drying conditions are low.
However, because its cold out there doesn’t necessarily imply that work must stop. It’s very possible to render during the winter months but to avoid potential pitfalls, we’ve got some tip that can be of great help. Let’s have a look!
✓ Check the weather forecast. Determine the drying and curing time and watch the forecast for the temperature dropping at night.
✓ Select the most suitable render. There are renders that are suitable for application in low temperatures to about 5℃ or even as low as 1℃. These types of render are fast setting which makes them perfect for the cold condition.
✓ Watch out for frost. Frost and render are enemies. Therefore, it won’t be wise to work with frosted materials, on frosted subtrates or apply below the recommended temperature that’s written on the product’s datasheet.
✓ Protect the finish. Make use of artificial enclosures around the scaffolding to battle adverse weather conditions.
Did you try rendering a wall but it doesn’t turn out the way you would have hoped for? Or perhaps you’ve been watching your wall render gradually deteriorate over time. Regard of your purpose, learning how to repair render cracks on wall is usually a great skill to have with your home maintenance in mind. However, whenever these crack are too large or difficult, we’d recommend you call in a reliable professional who can guarantee the best results for help. In this guide, we’re going to take you through the wall render repairing process. Let’s have a look!
No matter how solid a building material is, over time it’ll yield to the elements. When it comes to wall rendering it may be a case of too much sunshine or a costly mistake in the application process, but in truth, it cracks just because it cracks.
In order to repair render cracks, you’d have to start with a removal of damaged or cracked render. You’ll have to remove all the render or just a small section depending on the area you’re working on. If you’re able to clean all of the existing render as well as the paint over it all (both old and new), then removing a small section would work better as it makes it look neat and redone. Upon the removal of the existing render, the next important step would be to remove all loose material as well. Once done, you can then leave for up to 2 days to allow any trapped moisture to come out. Unfortunately, if the rains you’d have to wait till that dries too before you proceed.
Once dried, you can buy a pre-prepared render mix which already contains cement, lime and sand. Mix a 20kg bag with 4 litres of water (or check the product instructions and follow strictly), the mix to a fine consistency. Render is quick to dry, so you’d want to apply within 30 minutes of mixing. Make use of a trowel to apply the render on the affected spots and blend with the surrounding area.
Wall rendering is basically a process which involves the application of sand, cement or polymer covering to a home’s exterior in such a way that enhances its look while also offering an improved stability. The process is a perfect solution for several exterior concerns mainly due to the support its able to provide. It’s highly beneficial for older homes whose walls may suffer from poor quality because of wear over time, while it’s also greatly advantageous for newer homes as it increases their stability while also enhancing their visual appeal.
Knowing how to apply render is a great skill to have with your home’s upkeep in mind. The project can be done quite easily by any competent and confident DIYer. However if you lack any of those attributes, then we’d recommend you get in touch with a reliable professional for help. In this article, we’ll take you through the wall rendering process.
✓ Prepare the walls. This involves examining the wall, repairing any structural defects as well as stabilizing any movements to prevent the render finish from failing.
✓ External details. This includes the removal of bargeboards, rainwater, soil pipes, alarm boxes and all other external details.
✓ Insulation. In the event whereby external wall insulation is to be fitted, this is the stage to do so.
✓ Developing a foundation for the render to fix to. Apply a render mesh over the insulation, bedded into the first base coat layer of render.
✓ Building up the render.
✓ Render finishes. There are a wide range of colour options as well as various finishes available from very smooth to textured. However, you should note that thin coat render systems are usually designed to be self coloured.
✓ Final finishes. This involves the re-application of the external rainwater, soil pipes and the other external details.
We can help you get more wall rendering work with our qualified job leads and boost your business.
Join today