B G Evans Plastering
Based: in Holywell, CH8 8ADLatest review
Angela R., CH1
Ceiling | Plasterboard in Chester
Very helpful man did job really well cleaned up after himself I would recommend to friends
Are you trying to find Plasterboard ceilings in Rhyl? Our network of plasterers can assist with your project. All of our Plasterers in Rhyl are examined so you can see local honest reviews, when the business was set up, rankings, approval as well as cost, allowing you to make the right choice on who to employ. Let us take the trouble out of finding approximately 4 professionals for your Plasterboard ceilings job.
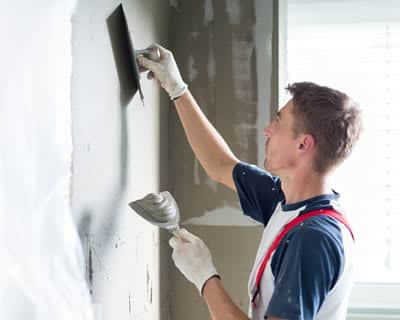
First and foremost, it should be specified that plasterboard or drywall is a panel of product which is usually pressed between a backer and a facer. The product has calcium sulphate dihydrate or gypsum as well as is used in the making of both ceilings and also indoor wall surfaces. In general, a plasterboarding ceiling system is mostly used in domestic buildings due to a variety of factors. These factors include its cost efficiency, being easy to mount along with its capability to improve the aesthetic appeal of a residential or commercial property. Among the most important benefits provided by plasterboarding a ceiling is the ability to hide things such as circuitry as well as services above the ceiling while additionally making it possible for adequate space to fit insulation products in the ceiling attic rooms.
Plasterboard is integrated to help both developers as well as building contractors to satisfy structure policies for a variety of things. These includes acoustic insulation, fire protection as well as thermal effectiveness. It's additionally able to regulate condensation in addition to possible damage in locations of high humidity.
When selecting plasterboard for your ceiling, there's a need to determine why you want to perform this job, before purchasing decision. There are numerous sorts of plasterboard offered in the market today which each having its own unique function. As an example, there are plasterboard that supply fire performance, acoustic or sound performance, thermal performance, influence resistance, vapour, moisture as well as water resistance and many more. Choosing the one the completely matches your demands will certainly go a lengthy to make sure that you derive full gain from your financial investment.
Is plasterboarding a ceiling a DIY work?
Have you determined to embellish your space or area? In order to get a clear vision of the excellent brand-new space, then you would certainly have to prepare for correct plasterboarding. This appears rather simple, ideal? Well, wait till you get going! Plasterboarding is a lengthy and also intricate job which involves the application of three various layers. As a result, contacting a specialist is most likely your best choice to ensure that the best feasible outcome is accomplished the first time. In case wherein you existing plaster is not in the best condition, there's a need to prepare for its substitute. If you do, after that you'll have to create a brand-new area with the help of a professional you stumble upon. In this article, we're mosting likely to take into consideration several of the advantages that features employing the solutions of a specialist plasterer.
Do you require to skim a plasterboard ceiling?
To get started, we'll need to think about precisely what skimming is. This is simply a technique of gluing which pertains to the application of a thin coat to walls to enable the smooth surface needed for painting or designing. It can either be use as a plasterboard cover or applied on an existing plaster finish depending upon the situation. It must, however, be stated that a skimmed surface is not the simplest of jobs and ought to only be done by a well-trained specialist that possesses vast years of experience as a plasterer. Because of the resemblances, skimming is typically misinterpreted for gluing but they're really miles apart. Standard plastering features a complicated procedure which includes three various layers of plaster-- which all needs time to dry before the next coat can be used. With higher demand and also tighter routine, time has gotten a whole lot a lot more valuable and plastering has advanced to meet the brand-new expectations. With a skim plaster, there's only a single coat to use that makes the task of a plasterer much easier as it can now be completed within a fraction of the moment that was once called for. So, is it necessary to skim a plasterboard ceiling?
Well, it depends. If the existing plaster wall surface remains in a good condition (still smooth and also with no major fractures or chips), then skimming is not truly necessary. In case wherein you've currently connected plasterboard or drylining, the choice you have includes either painting or decorating straight onto the board or utilizing a layer of skim plaster for the finishing. However, skimming tends to be a more popular option because of its remarkable finish as well as enhancement of an extra noise proofing layer.
What Impacts the Expense of placing in Plasterboard ceilings?
Mounting a plasterboard on your ceiling features a lot of advantages. Not just does it update your building and has a reduced atmosphere impact, but it's additionally easy to repair, fire resistant and aids to hide great deals of stuff-- making it a really a sensible financial investment. If you're seeking to have this done, then you 'd likewise possibly want to know simply how much it'll cost to obtain your task over the line. Unfortunately, when it concerns setting up plasterboard on a ceiling, you won't be able to obtain specific price quote as the last expense is generally affected by a number of points. In this message, we're mosting likely to think about some of the factors that can have a excellent influence on the last cost of mounting plasterboard ceiling.
We will give as much as four Plasterboard ceilings's locally, who will certainly supply quotes for the job you want done. You'll get a home visit from professionals in Rhyl who'll aid you to select the right options for your house prior to carrying out the work. Enter your postal code to begin browsing now.
The regular cost of Plasterboard ceilings is £300 in Rhyl. Costs can change based on the materials and the provider chosen. The upper price range can be as high as £600 depending on the size of the room. The material costs are in most cases about £75.
| Avg. price low | Avg. price low |
|---|---|
| Avg. price | Avg. price |
| Avg. price high | Avg. price high |
£700
£525
£350
£175
£0
| Labour cost | £210 | |
| Material cost | £75 | |
| Waste removal | £15 |
Requests for quotations in Rhyl in February 2025
Requests for Plasterboard ceilings quotations in Rhyl in February 2025. 0% change from January 2025.
Requests for Plasterboard ceilings quotations in Clwyd in February 2025. 0% change from January 2025.
Very helpful man did job really well cleaned up after himself I would recommend to friends
Answer a few quick questions, so we can match you with local plasterers who can help.
Get free, no-obligation local plasterboard ceilings quotes from 4 verified plasterers working in Rhyl.
Compare customer reviews, services and prices, and choose the right tradesperson for you.
Would highly recommend, they found me a firm which I was happy with a quote they give me and went ahead and had my job done within 2 days of enquiring.
Good easy way to find a selection of trades you need all in one place.
Love LeadsDoWork it's a big part of my Business I would recommend to anyone
Also commonly referred to as drywall, plasterboard is an incredibly versatile product which features a sandwich of gypsum plaster between thick paper layers. It’s mainly used on both walls and ceilings due to the wide range of benefits it provides. Not only can plasterboard be made to be humidity resistant, fire resistant as well as noise resistant, but they’re also known to have a low environment impact, easy to repair and can be used to conceal stuff from plain sight. As a result of these benefits couple with the fact that they also happen to be quite affordable, plasterboard has grown to become a ubiquitous phenomenon in modern residential buildings.
When it comes to the installation of plasterboard on ceilings, one of the major sources of concern for several homeowners is the determination of the thickness required to ensure a durable and long-lasting project. If you’re planning to fit plasterboard on your ceiling and wondering the thickness that’ll be appropriate, then you’ve come to the right place. In this post, we’re going to give you a good insight on what plasterboard to use for ceilings. Let’s take a look!
First and foremost, the standard plasterboard sheet size is 120 cm in width and within the range of 180 cm to 360 cm in height. These sizes are designed to provide the much-needed support to the standard stud spacing which is 160 cm. Depending on the manufacturer, plasterboard can be in four different widths. Now talking about the thickness, there are two standard thicknesses of plasterboard - 9.5 mm and 12.5 mm. The sizes of plasterboard for ceilings are 9.5 mm or 10 mm. Most individuals tend to assume that the thicker the plasterboard the better, but this is absolutely false. A thicker plasterboard will only stick harder to the ceiling which will make it hard to seal joints if required.
If you’re looking to plaster your ceiling, one of the most essential parts of the process is cutting the plasterboard. Once you’re able to master this skill, the rest of the plastering is quite easy. This is a task that can be done by any competent DIYer but with a little bit of patience and confidence. If you lack any of these attributes, we’d strongly recommend you call in a reliable professional who can guarantee the best results for help. In this guide, we’re going to take you through the plasterboard ceiling cutting process. Let’s take a look!
To cut plasterboard ceiling, you don’t need any expensive tool which is usually not the case when it comes to carpentry. If you won’t be cutting a lot of plasterboard, all you really need would be just an old handsaw or plasterboard one, a Stanley knife as well as a straight edge. However, if you’ll be cutting lots of plasterboards, you’ll require the following to make your task a lot easier:
✓ An old handsaw
✓ A Stanley knife and many spare blades
✓ A straight edge like a long spirit level
✓ A surform
✓ A battery drill and oh2 screwdriver bits, with specific plasterboard screws.
To cut plasterboard to length, you’ll have to first score a line on the face side of the board with a straight edge and Stanley knife. Once done, simply lift the sheet off the ground and snap it along the score line. Then, you can run your knife down the other side of the board , cutting the back of the plasterboard backing sheet. Upon completion, your plasterboard is now ready to be fitted on your ceiling.
Plasterboard or drywall is simply gypsum plaster covered from both sides by thick paper layers. It’s known to be a highly versatile product used on both interior walls and ceiling as a result of its numerous advantages. This popular material in residential buildings can be designed to be fire resistant, humidity resistant and noise resistant. They have a low impact on the environment, while also being quite easy to repair and perfect to hide stuffs from plain sight. Most home and property owners in the UK have this material installed in their space as despite the multiple benefits, they’re also quite affordable. However, if you’re thinking about installing a plasterboard on your ceiling, one challenge you’re likely to face is determining the appropriate plasterboard thickness to incorporate as this make or mar your entire project. In this post, we’re going to take a look at the right plasterboard thickness for ceiling so as to help you make an informed decision moving forward. Let’s take a look!
Firstly, let’s consider the size of the plasterboard sheet. The standard plasterboard sheet size is 120 cm in width and within the range of 180 cm to 360 cm in height. These sizes are designed to provide the much-needed support to the standard stud spacing which is 160 cm. Depending on the manufacturer, plasterboard can be in four different widths. Now talking about the thickness, there are two standard thicknesses of plasterboard - 9.5 mm and 12.5 mm. The sizes of plasterboard for ceilings are 9.5 mm or 10 mm. Most individuals tend to assume that the thicker the plasterboard the better, but this is absolutely false. A thicker plasterboard will only stick harder to the ceiling which will make it hard to seal joints if required.
Installing a plasterboard on your ceiling is a cool way to modernize your property. Over the past couple of decades, there has bee an increasing number of trends associated with plastering of both walls and ceilings such as rounded edges and textured plaster. However, in recent times, home and property owners are now looking to install more of sharp edges. If you’re planning to plaster your ceiling, you’d probably want to know just how much this project is going to cost. If yes, then you’ve come to the right place. In this article, we’ll give you a rough estimate of ceiling plastering costs.
There are a plethora of factors the can influence the price of plastering your ceiling. These pricing components includes the following:
✓ Size. As you would have expected, the larger the job, the more the overall cost. However, the price per square metre will reduce which means that the cost of plastering a small ceiling space will cost more per square metre than the cost of plastering a larger ceiling space per square metre.
✓ Materials. We have a wide range of plasterboard available in the market. If you need a fire retardant, acoustic or other types of specialist plasterboard, you can expect to pay higher than standard plasterboards.
✓ Location. Just like many other home improvement projects, the cost of plastering ceiling varies greatly throughout the UK. Places such as London and the South East have the highest prices due to the high standard of living as well as greater demands.
In general, to plaster a ceiling (small 2 m x 2 m) - overboard and plaster will cost within the range of £200 to about £300. Also, to plaster a ceiling (large 5 m x 6 m) - overboard and plaster will cost within the range of £400 to about £600. The average plasterer’s daily rate (including material) is about £180 to £300 and ceiling plastering cost per square metre ranges between £20 to £40.
We can help you get more plasterboard ceilings work with our qualified job leads and boost your business.
Join today